Monday, May 16, 2011

Pizza with Caramelized Onions & Kalamata Olives

When I was a kid growing up in the midwest, I thought the spongey, greasy stuff they sell at Pizza Hut was pizza. I loved it.. until I moved to the Northeast and had really fantastic pizza.

Then I had the opportunity to go to Sicily. That really opened my mind to the potentials of pizza. To my mind, Sicilians used some very unusual toppings on pizzas. The one that seemed oddest to me was a pizza covered with lettuce -- and they baked it. It was delicious -- just unexpected.

One of my all-time favorite pizzas was from a mom-and-pop store in our neighborhood outside of Philly. It was a vegan pizza, smothered in caramelized onions... Yum! When we moved to Jersey, leaving this pizza behind was a sad, hard thing to do. :-(

Although the olives are my own added touch, this is my attempt to recreate that dish.

Pizza with Caramelized Onions & Kalamata Olives

Ingredients:
  • 1/2 recipe Quick Whole Grain Pizza Dough or enough pizza dough for a 13"-14" pizza
  • Cornmeal for dusting (optional)
  • 2 Tbsp olive oil
  • About a pound of onions, halved lengthwise, then thinly sliced crosswise
  • 1/2 tsp dried rosemary leaves (optional)
  • 1/2 tsp sugar
  • Salt & pepper to taste
  • your favorite pizza sauce
  • Kalamata olives -- pitted and sliced in half lengthwise
Directions:

Put the oven rack at its lowest position. Preheat your oven to 500 degrees F.
  •  If you have a pizza stone, let it heat up inside the oven. Dust a pizza paddle with cornmeal and set aside.
  • If you do not have a pizza stone, prepare a 12"-14" pizza pan by lightly oiling it or sprinkling it with cornmeal. Set it aside.
In a large skillet, heat the 1 Tbsp of oil over medium-low heat. Add the onions, rosemary (if using), and sugar. Cook uncovered until the onions are very tender and light golden (about 25-30 minutes). Stir occasionally. Season with salt and pepper and set aside.

On a floured surface, roll, stretch, and shape the pizza dough into a 12"-14" circle (to fit your pizza pan or pizza stone). Transfer the dough to the prepared pizza paddle or pan.

Spread a layer of pizza sauce onto your dough. Cover the sauce with the onions. Arrange the cut olives on top of the onions. Drizzle the remaining tablespoon of olive oil over the pizza.

Bake until the edges of the crust are golden brown, and the bottom of the crust is crisp. About 12 minutes, give or take a few minutes.

Cut into wedges and serve.

Quick Whole-Grain Pizza Dough

My kids are picky eaters, but they like pizza. I use this to my advantage. I'm not above trying to sneak any kind of veggie into a pizza. I also make my own crust so that my boys get more than just simple carbs.

Unfortunately, I find that my kids revolt if I make a 100% whole grain pizza crust, but I'm willing to compromise. I use approximately a 50/50 mix of unbleached white flour and whole grain flour. The whole grain flour I use varies. It might be whole wheat flour. It might be a blend of flours. My dad gave me a flour mill, so sometimes I add a little ground oats, barley, brown rice, quinoa, amaranth... it all depends on my mood and what's in the cupboard. I do recommend staying away from very strongly flavored grains like toasted buckwheat (ok, that's a seed) because they can affect the flavor of the crust. and some kids may strongly object.


I use a stand mixer to mix my dough. I find that this just works well for me because it mixes easily, and if I need to adjust the amount of flour or water in my recipe, I can do so pretty easily and quickly.

One of the drawbacks of using various whole-grain flour mixtures is that the flour quality varies tremendously. Even humidity in my kitchen affects the dough. This makes it really hard to tell you how much flour/water to use. However, you want your dough to be sort of smooth and silky, and it should bounce back a little when you press it with your finger.

The yeast is really important in this recipe. My recipe calls for a generic instant yeast. However, the only yeast I ever use is called Fermipan Instant Yeast. I love this stuff. I order it in bulk from Honeyville Grain. I don't even proof it, I just toss it into the mix. I've never ever had Fermipan fail to rise. I can't say the same for Fleischman's.

Finally, some notes on cooking. I bake my pies on a pizza stone at 500 degrees F. In my oven, it takes about 8 minutes, but my oven is temperamental. Cooking times may vary in your oven. Also, if you use a metal pan, that may affect your cooking time, but I don't know by how much.

In short, I think any kind of yeast dough is equal parts art and science. After hundreds of pies, I work by sight and touch as much as by measurements. So if at first you don't succeed, try again, and modify this basic recipe to your taste. In any case, it's very hard to mess up this dough.

Quick Whole-Grain Pizza Dough

Ingredients:
  • 1 cup unbleached all-purpose white flour or bread flour
  • 1 1/3 cup whole grain flour (can be whole wheat or a blend of flours)
  • 1 Tbsp nutritional yeast (optional)
  • 1 Tbsp ground flax seeds (optional)
  • 1 Tbsp instant yeast
  • 1 tsp salt
  • 1/2 tsp sugar
  • 2 -3 tsp olive oil
  • Approximately 1 cup warm water (give or take a couple of Tbsp)
Directions:
Put all ingredients into a stand mixer. Use a dough hook to mix all the ingredients. (Note, you might want to start with 3/4 cup + 2 Tbsp  water. Gradually increasing water until the dough looks right.) If the dough is too wet/too dry, add a little flour or water as necessary.

Let dough rest 15 minutes before using.

Makes 2 13" to 14" pizzas.

    Tuesday, April 26, 2011

    Tea Eggs

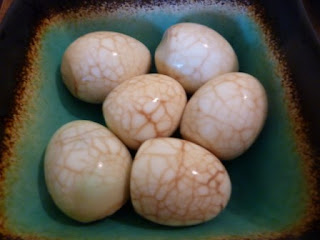
    Once Easter is over, one is typically left with lots and lots of eggs. Instead of egg salad or deviled eggs, why not try these Chinese tea eggs. Boiling/soaking eggs in a mixture of tea and spices creates a lovely pattern that reminds me of celadon pottery. The eggs are so beautiful that it's almost a shame to eat them -- almost.

    Note: This particular recipe calls for a dozen eggs, but you could make fewer if you wanted to. However, the eggs take quite a while to cook/soak, so you might as well make a lot of them.

    Tea Eggs

    Ingredients:
    1 dozen hard-boiled eggs, cooled -- do not peel
    12 bags of black tea or about 1/4 cup of black tea leaves
    3 to 4 Tbsp soy sauce
    Approx. 2 tsp salt
    Approx. 2 tsp. five-spice powder

    Directions:
    Using the back of a spoon, gently tap the eggs until their shells are cracked all over. Do not peel the eggs.

    Place the eggs into a pot of water. Add enough water to cover the eggs. Add the rest of the ingredients. (Note: If I'm using tea bags instead of leaves, I cut the tags off so that they don't burn on the stove.) Bring the pot to a boil.

    Turn down the heat, cover, and simmer for about 40 minutes. Stir occassionally.

    Turn off the heat and cool the eggs in the liquid for about an hour.

    Peel the eggs and serve. You can also refrigerate them up to 3 days.

    Tuesday, April 19, 2011

    Bento Time!

    I have a deep and irrational love for bento boxes. Not that I have any talent (or time) for actually making up really cool ones (seriously -- some people create whole tableaux), but I do enjoy them nonetheless.

    Wikipedia defines a bento as "a single-portion takeout or home-packed meal common in Japanese cuisine. A traditional bento consists of rice, fish or meat, and one or more pickled or cooked vegetables, usually in a box-shaped container."

    What a dull definition for something that can be so fun and exciting and whimsical!

    A bento can be a simple, but pleasing, arrangement of complementary shapes and colors. Really sophisticated ones approach being works of art.

    Today, I made a very, very simple bento for my in-laws to take with them on their trip (shown at right). It was just a sandwich with veggies (unfortunately, you can't see them in this photo, but I included carrots, celery sticks, grape tomatoes, and mini bell peppers) and a happy face made from a Babybel cheese. I got the idea for the faces from a blog called Cute Food For Kids. It wasn't a particularly exciting lunch, but when they opened it, I just wanted to give them a little surprise that would make them smile.

    If you're interested in bentos, you could check out Just Bento, which is another blog I follow. I Love Obento! also has a wonderful bento gallery. Some of the creations you see there are truly fantastic.

    In any case, bentos give me an excuse to collect more kitchen tools and gadgets (as if I really need a reason). They're also one of my little acts of love for my family. Especially when I know I've put a nice lunch together, I never get over the thrill of hearing my boys exclaim, "You're the best, Mom!"

    Wednesday, April 13, 2011

    I'm on a Mission to Figure out this Dessert!

    My husband brought a dessert from a Turkish restaurant home today. Actually, he thought it was baba ghanouj, but as you can see from the from the photo, it is anything but eggplant.

    It's some sort of rice pudding with a hint of cinnamon and coconut. It's also garnished with chopped pistachios, coconut flakes, and streaks of cinnamon. It's really, really lovely -- not too sweet and very creamy and light. The baby and I are loving every bite.

    I have all kinds of recipes for various Middle Eastern rice puddings. Some are flavored with rose water, others with lemon peel or vanilla. However, I can't find anything that accounts for this unusual color. Cocoa? It doesn't taste very chocolatey, though. Some sort of bean?

    It's been awhile since a food has stumped me like this. It's kind of exciting really. I'm on a mission to figure this one out! One of these days, I hope to post a recipe for this dish.

    Does anyone have any ideas what this is or how to make it?

    --------------------

    Updated 4/26/2011

    I think I may have hit on the secret ingredient. This rice pudding doesn't taste so very different from other rice puddings. It's just the color that's unusual. I'm thinking that maybe they substituted black rice for part of the white rice... Just a thought.

    Salt and Pepper Walnuts

    A couple of weeks ago, we had some company over for dessert, and I tried out this recipe for Salt and Pepper Walnuts on them. It comes from Vegetarian Cooking for Everyone by Deborah Madison.

    I served it alongside a cheese platter, dried fruit, grapes, sliced apples and pears, and an apple crisp. The walnuts were a definite hit.

    Although I served it with dessert, I think it would be a great appetizer or snack, too. The salt and pepper give the walnuts a bit of zip. Also, the walnuts are full of good fatty acids, so you don't have to feel guilty munching.

    Salt and Pepper Walnuts

    Ingredients:

    1 cup walnut halves or pieces
    1 tsp walnut oil
    Sea salt and freshly ground white pepper (to taste)

    Directions:
    Preheat the oven to 325 degrees F. Spread the nuts on a baking sheet and bake until they smell toasty (about 10 minutes.) Remove nuts from the oven and toss with the oil, salt and pepper.

    Notes:
    Although the recipe calls for walnut oil, I accidentally used almond or hazelnut oil on them. They were still yummy, though. If you don't have walnut oil, I imagine that a very light oil like grapeseed oil would work, too -- I just would want to choose an oil that's not too viscous and that complements the flavor of the nuts.

    After tossing my nuts (now that just doesn't sound right, does it?), I spread them out on a piece of waxed paper until they cooled. I thought they might get moist if I just put them in a bowl.

    Asparagus with Sesame Oil

    One of the many reasons I love spring is asparagus! I'll eat it up pretty much any way you want to serve it -- steamed, broiled, stir-fried, raw... just bring it on!

    This recipe is one of my favorite ways of preparing asparagus for two reasons. 1) It's really fast and easy to make. (We're talking less than 15 minutes from start to finish!) 2) It introduces another of my favorite flavors -- sesame oil.

    Note:
    Although you don't have to, if you have time, you may want to soak your cut asparagus in cold water for 20-30 minutes before cooking it. This will crisp it up. Just be sure to drain it well (and maybe even pat dry with a clean dish towel) so that you don't get spattered when you toss your veg into the frying pan.

    Asparagus with Sesame Oil

    Ingredients:

    1 bunch of asparagus, trimmed and cut into 1-2 inch long pieces.
    approx 1 1/2 - 2 Tbsp olive oil
    approx 1/2 tsp salt
    a few Tbsp of water (about 1/4 cup)
    approx 1 1/2 Tbs sesame oil

    Directions:
    Heat the oil in a skillet over medium-high heat. When it's nice and hot, add the asparagus and stir fry until all the pieces are coated in oil. Add the salt and stir. Add the water.

    Cover the pan and turn the heat to medium-low. Cook the asparagus until it is bright green and cooked through, but still crisp. The length of time depends on how thick your asparagus is. If it's pencil-thin, it may be only a minute or two.

    Remove the cover, and turn the heat up to high. Quickly boil away any extra water while continuously stirring the asparagus.

    Mix in the sesame oil. Transfer to a platter and serve.

    Thursday, April 7, 2011

    Moroccan Carrot Salad (Khissoo)

    Clockwise from top right:
    Spinach salad, Moroccan carrot salad,
    rice, okra & chickpea stew
    Given that my blog title promises to go beyond salad, the irony of posting a salad recipe is not lost on me. However, this one is really worthy of sharing. My dad and I love it so much, we could eat the whole salad ourselves, so I always make double if he's around.

    This recipe is based on one found in Classic Vegetarian Cooking from the Middle East & North Africa by Habeeb Salloum. However, to suit my own tastes, I've decreased the sugar slightly and increased the amount of cinnamon.

    A couple of notes:
    • Once, I made this salad without orange-flower water. It was still good, but it just wasn't the same. It's worth finding a Middle Eastern or Indian grocery store for this ingredient because the orange-flower water totally transforms this dish into something unusually special.
    • Grating so many carrots might seem like a daunting task, but if you have a food processor (or some older children), it doesn't take too long at all.

    Moroccan Carrot Salad (Khissoo)

    Ingredients:
    6 large carrots, grated
    A little less than 1/4 cup sugar
    4 Tbsp fresh lemon or lime juice
    4 Tbsp olive oil
    1 tsp orange-flower water
    3/4 tsp cinnamon

    Directions:
    Combine all ingredients in a bowl. Chill. Stir before serving.
     

    Okra and Chickpea Stew (Bamya wa Hummus)

    I'm ambivalent toward okra. At the risk of offending many Southerners, my first experiences encountering this vegetable were with battered, deep-fried okra. At best, I found it edible. At worst, it was a greasy, oily mess.  Later in life, I had some okra dishes that weren't so bad, but I think the psychological damage was already done.

    On the other hand, my husband loves okra. Since there was a sale on frozen okra last week, I figured I'd make some for him. Usually, I stew it with tomatoes, but this time, I thought I'd try something new. (By the way, if you have any favorite okra recipes, I'd love to hear them!)

    The following recipe is based on a Syrian/Lebanese one from Classic Vegetarian Cooking from the Middle East & North Africa by Habeeb Salloum. However, to suit my own tastes and to avoid ending up with a bunch of rag-tag ends, I've changed the proportions for just about every ingredient in the recipe.

    This dish was a great success with my husband, and I have to say that I was quite pleased as well. It had a light spicy, savory, lemony flavor. Plus, it was even better the next day after the flavors had time to meld.

    Clockwise from top:
    Carrot salad, rice,
    okra & chickpea stew, spinach salad

    Okra and Chickpea Stew (Bamya wa Hummus)

    Ingredients
    4 Tbsp oil (I used 2 Tbsp olive oil and 2 Tbsp coconut oil)
    2 big onions, chopped
    5 cloves garlic, crushed
    1/4 to 1/2 tsp crushed hot pepper (or to taste)
    1 16 oz package frozen, cut okra, thawed
    3 cups cooked chickpeas (if you use canned, about 2 15-oz cans, drained)
    5 Tbsp fresh lemon juice
    3/4 tsp of each of the following: ground cumin, ground coriander, ground mustard
    Sea salt & pepper to tast
    1 cup water

    Directions
    Heat oil in a pot.  Saute the onions, garlic, and hot pepper over medium heat for 10 minutes. Add okra and stir fry for 3-5 minutes. Add the rest of the ingredients and bring to a boil. Cover and simmer for 25 minutes over medium-low heat. If you need to add more water, do so.

    Notes: 
     According to Salloum, okra should never be cooked in aluminum, iron, or tin because it will discolor.

    Also, the recipe calls for whole frozen okra pods, but the cut okra worked just fine.

    Wednesday, April 6, 2011

    Why I Started Using Raw Virgin Coconut Oil

    Last year, my daughter had a terrible case of eczema. I followed the doctor's instructions to a T. I rarely bathed her and never used soap. I lotioned her religiously, but no matter what I did, it wouldn't go away. In fact, it spread from her back to her chest, arms, and legs.

    Finally, out of desperation, I tried adding coconut oil to her bath water and smearing coconut oil all over her body. Within a few days, the eczema was gone.

    Since then, I've learned that raw virgin coconut oil is super healthful. It's chockful of lauric acid (a key component of breast milk). It has antimicrobial, antioxidant, antibacterial, antifungal, and antiviral properties. It also stimulates the thyroid gland, and it's easy to digest.

    A few months ago, I saw that Dr. Oz featured coconut oil on one of his shows. I don't really watch his show, but he apparently recommends coconut oil topically as a moisturizer as well as internally for ulcers. He also says it can help with weight loss. (You can view video clips from his show if you like -- Coconut Oil Super Powers Part 1 and Coconut Oil Super Powers Part 2.)

    Of course, all these benefits are true ONLY for raw virgin coconut oil -- NOT the processed (refined) kind.

    I use quite a lot of coconut oil these days. Wherever I can, I try to substitute coconut oil for all or part of the fat in a recipe. I also use it as a moisturizer, in the bath, on my hair -- I even give myself facials with coconut oil.

    I guess coconut oil is becoming mainstream because I can find it at my local supermarkets. That's where I got my first (rather pricey) jar. However, because coconut oil doesn't really go rancid like olive oil, I now purchase it by the gallon from Nutiva. (I also get a better deal that way.)

    I know this all sounds interesting, but you're probably wondering how it tastes, right? Raw virgin coconut oil has a really lovely light coconut aroma and flavor.

    If you've never tried it before, I highly recommend it. It can really give recipes a new flavorful dimension. And if you don't like it, you can always bathe in it. Your skin will thank you for it! :-)

     If you have used coconut oil, I'd love to hear what you think about it. How do you use it?


    Monday, April 4, 2011

    Potatoes and Tomatoes with Fresh Coconut

    Last week, I tried a new Indian recipe out of Madhur Jaffrey's World-of-the-East Vegetarian Cooking. I made a couple of changes to the recipe because I didn't want to use quite as much oil, and I was out of red wine vinegar. (Weird, because I always have at least five different kinds of vinegar in the cupboard.) My changes are in the recipe given below, but I've made note of what the original recipe called for in the notes.

    Verdict: The baby and I liked it. It had a rich, tangy flavor. My husband thought the flavor was great, but he didn't like the texture of the coconut and picked around it. I guess I won't make it again for him, but I might make it if he goes on a business trip.

    Potatoes and Tomatoes Cooked with Fresh Coconut

    Ingredients:
    3 medium-sized potatoes, cut into 3/4" dice
    2 Tbsp coconut oil
    6 cloves of garlic, minced
    1 dried hot red pepper
    1 tsp whole cumin seeds
    1 1/2 cps freshly grated coconut
    1/2 tsp turmeric
    2 tsp ground cumin
    Approximately 16-20 oz can diced tomatoes (including juices)
    2 tsp salt
    2 tsp sugar
    1 tsp lemon juice

    Directions
    Heat the oil in a 3-quart pot over medium-high heat. Add the garlic and stir for about 5 seconds. Add the hot pepper and the whole cumin seeds. Stir until the garlic begins to brown, the pepper darkens, and the seeds begin to pop.

    Lower the heat to medium and add the grated coconut. Stir for about 10-15 seconds.

    Add the potatoes, ground cumin, tomatoes, salt and 1 1/2 cups of water. Bring to a boil. Turn heat to low, cover, and simmer for about 45 minutes (until potatoes are tender). Stir occasionally (about every 7-8 minutes).

    Add the sugar and lemon. Stir again and cook uncovered for about a minute.

    Notes: The original recipe called for 1/4 cup veg oil instead of coconut oil. It also called for 1 tsp red wine vinegar instead of lemon juice.

    Wednesday, March 30, 2011

    Part 2: Shredding/Grating Coconut

    In Part 1, I wrote about selecting and opening coconuts. After the coconut is open though, how do you use it?

    If you're interested in using fresh coconut, you need a way to grate it.

    I love cooking with coconut. Fresh coconut, that is. IMHO, the dry, white, sugary shreds of sawdust sold in bags are not fit to bear the name of coconut. I've heard that they're the pulp that's left over after the oil and moisture have been extracted for coconut milk. I can believe that because they don't even compare to the fresh stuff.

    Bench-type grater
    $16.50 from GroceryThai.com

    In the past, I'd use a table knife to extract thin slices (about 1/2" wide) at a time. (Note: Please, don't use a sharp knife. I did that once, and the knife slipped, giving me a 1 1/2 - 2" long gash in my palm) Then I'd put all my slices in my Vitamix blender and pulse it to "grate" them. However, I'd always long for a tool like the one I'd seen used on Guam. 

    It was basically a bench or a long board with a serrated metal disk at one end. A person would put a bowl or plate on the ground under the disk. Then, they would sit on the bench/board and grate the coconut on the disk. The grated meat would fall to the plate. I've seen people grate whole coconuts efficiently in a matter of a few minutes.

    I began hunting for coconut graters/shredders. I saw some pretty cool gadgets online, but in the end I decided to go back to basics and ordered three simple tools from a site called GroceryThai.com.

    Exhibit A
    Exhibit A:  This item has blades on both ends. One is for making fine gratings. The other is for wider shreds. It was only $4.50, which probably accounts for the very flimsy construction of this tool. Even the color used to dye the tool was coming off on my hand.

    As for performance, it took some real pressure and wrist strength to get it to work. However, I couldn't help feeling that any significant amount of pressure would break the tool. Since I didn't want to injure myself, I gave up almost immediately.

    Exhibit B
    Exhibit B: This grater was $4.99. Although it was only 49 cents more, there was a noticeable improvement in construction. For starters, the blade felt like it wasn't going to fly off and hit me in the eye.

    The round, serrated blade that you see worked well. However, it required considerable wrist strength, and I had to keep stopping in order to rest.

    Although you can't see it in this photo, there is a scraping tool for wider shreds on the other side of the blade. I found that tool useless. I couldn't get enough purchase on the meat to make any shreds.

    Overall, I would not recommend this tool. It hurt my wrist. Also, I have big hands, so I kept worrying that I would skin my knuckles on the scraper.

    Exhibit C
    Exhibit C: This item was listed as a tabletop grater for $11.50. I debated between getting this item or the bench you see pictured at the top of this screen. The difference in cost was minimal, but ultimately, I decided a potentially lethal piece of furniture around small children was not altogether prudent. Also, with limited storage space, this one could hang on the wall.

    It's a very sturdy tool, but I'm not sure how it could be used on the tabletop. Maybe you could clamp it. Otherwise, I'd be afraid of the wood slipping.

    I ended up putting it on a small child-sized chair and sitting on it, just like I remember from my days on Guam. It worked beautifully! I grated half a coconut in under 2 minutes -- sure beats all the work of removing the coconut from the shell with a knife. (Note: There is a special tool available for removing all of the coconut meat in one piece. But if I'm going to grate it anyway, I think this is just as fast as removing, cutting, and then grating in a blender.)

    I only wish I had read the description better, because I was expecting a bigger board like the ones from my childhood. This was small -- about 12"L x 3"W. However, the essential part of this tool -- the scraper -- is attached by three screws, which I think I can remove and attach to a bigger (and prettier) board. In the meantime, I'm going to drill some holes in this one so that I can put it away.

    Now there are other types of graters. Lots of types. If you have a local Indian or Southeast Asian grocer near you, you might want to check in and see what they have. However, as a caution, I would be leery of any that use suction to attach to a countertop. I have some tools like that, and I always end up clamping them down. The last thing you want is some whirling scraping blade flying off the counter.

    Part 1: Selecting and Opening Coconuts

    When I was in fifth grade, we moved from the frozen North to a tropical island. I remember going late at night from the airport to the hotel, counting coconut palms the whole way.

    Thanks to a diversion to the Philippines because of a tropical storm, we'd been traveling for at least a day and didn't arrive at our destination until quite late. Still, after checking into our room, the first thing I did was run out to the hotel parking lot and grab as many coconuts as I could carry. I've been koo-koo for coconuts ever since.

    Nowadays, when I'm picking coconuts at the store (not the young green ones, but the brown kind that look like a monkey head), I get a lot of questions about what to look for. I'd love for every one to share my joy, so I'm sharing a few tips.

    I think it looks like a capuchin monkey --
    or maybe a lemur, at any rate
    Selecting a Coconut
    1. Make sure there are no cracks, holes, or breaks.
    2. Look for any signs of mold or mildew. I think it should go without saying, but you don't want that.
    3. Especially check around the "monkey face." Make sure that the "monkey face eyes" are not soft or moldy or spotty. I've noticed that this is where the coconut palm roots first appear. Often, I've found soft spots indicate that the roots have started forming.
    4. Shake the coconut. You want to hear lots of water inside. More fluid means a younger, softer, moister coconut.
    Note: This doesn't mean that you're guaranteed a great coconut, but hopefully it will be a good one. I also recommend getting a couple because you can never be completely sure until you open them.


    Opening a Coconut

    This is how my Chamorro teacher taught us to open coconuts.
    1.  Hold the coconut in one hand. 
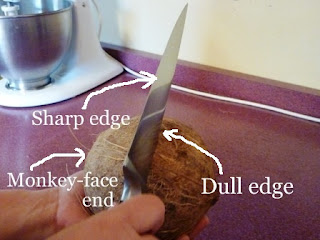
    2. With the other hand, use a heavy knife or cleaver to strike the coconut along its middle. I like to use the heaviest part of the knife, near the handle.

      Safety Tip: Hit with the dull side of the blade. Do not use the sharp side of the blade or you'll wreck your knife and do yourself an injury.

      Note: This is not the time to be shy. Polite tapping and knocking aren't going to work. Be decisive and firm in striking your blows.

      Note: Instead of a knife, you could use the nail remover on a hammer, striking so that the prongs land in a line along the coconut's equator just the way a knife would. If you use the "hammering" end, you can bash the coconut into tiny bits where you strike it.
    3. After striking, turn the coconut slightly in your hand and whack it again. 
    4. Continue in this fashion, striking a blow at the coconut's equator and then turning. Do this until you see a crack. 
    5. Drain the coconut water through the crack into a container. You can drink this if you want.
    6. Continue striking/turning to open the coconut completely.
    Note: After you break your coconut open, taste a piece. It should taste fresh and sweet and coconutty. If it tastes moldy or rancid, chuck it.1 That's why we got two coconuts. :-)

    If you want to learn how to grate coconut meat easily, check out Part 2: Shredding/Grating Coconut.


    1When I get a bad coconut, I put it out for the birds and squirrels. They don't seem to mind.

    Monday, March 28, 2011

    Banana Smoothies

    One for me, One to share
    If I'm in a rush for breakfast or just craving something sweet, a banana smoothie usually hits the spot. Smooth, creamy, cold, and frothy -- it feels decadent, but it's not.

    Now the instructional designer in me is cringing because I don't have a really precise recipe to give you. I tend to just dump stuff in the blender. However, smoothies are really hard to mess up, so I think if you try making this, you'll be OK.

    Banana Smoothie

    Ingredients:
    • 1 Banana (preferably one that is quite ripe or a little overripe)
    • Sweetener of your choice, to taste
    • A few drops of vanilla (maybe about 1/16 to 1/8 of a tsp)
    • A few ice cubes
    • Non-dairy milk of your choice, enough to reach a consistency that you like (For me, it's approx. 3/4 - 1 cup)
    Directions:
    Put everything in a blender and blend until smooth and frothy.

    Notes:
    I like agave nectar because it has a light flavor and a lower glycemic index than sugar, but you could use anything you like -- sugar, honey, maple syrup... I've even used palm sugar and date sugar -- I think they're especially good with the banana.

    I have a Vitamix blender, which is like the granddaddy of all blenders. You could probably blend a wooden post in it. As a result, ice is not an issue. My old blender couldn't handle big ice cubes, though, so I'd have to crush the ice first.

    Sometimes, I omit the vanilla and ice. Instead, I add frozen fruit to make it cold -- pineapple, mango, and strawberries are all great additions.

    You can use any non-dairy milk you like. My favorites are Silk soymilk and Almond Breeze almond milk because they make it very creamy, more milkshake like. However, if I have some leftover coconut milk, I'll even toss that in -- especially with some frozen pineapple, I feel like I'm on a vacation in the tropics.

    Sunday, March 27, 2011

    Whole Wheat Chocolate Chip Cookies

    My boys are picky eaters, but they love chocolate chip cookies. They'll also eat things in chocolate chip cookies that they wouldn't normally touch, so I try to sneak in fiber, omega-fatty acids, and other healthful stuff.

    Now I won't go so far as to say that my recipe is healthful. It's just less unhealthful than lots of other recipes.

    A couple of notes on this recipe:
    • I like to use white whole wheat flour when I bake. Not whole wheat flour made from red wheat.
    • Below, I just listed 2 cups of flour. You could use 2 cups of all-purpose (though they wouldn't be whole wheat cookies then) or 2 cups whole wheat or any mix of all-purpose and whole wheat that will give you two cups. I usually do a 50/50 mix.
    • If you don't have almond meal, no big. Just add another 1/4 cup flour.
    • Make it Vegan: 1) Replace the butter with a non-hydrogenated spread like Earth Balance or Smart Balance. One day I'd like to try replacing the butter with coconut oil. When I do, I'll let you know how it works. 2) In the past, I've had good results replacing eggs with a substitute called Ener-G. 3) Use vegan chocolate chips.

    Whole Wheat Chocolate Chip Cookies

    Ingredients:
    • 2 cups flour
    • 1/2 cup almond flour (sometimes called almond meal)
    • 1-2 Tbsp ground flax seeds (optional)
    • 1 tsp baking soda
    • 1/2 tsp salt
    • 1 cup butter, softened
    • 3/4 cup sugar
    • 3/4 cup brown sugar, packed
    • 2 tsp vanilla
    • 2 eggs
    • 12 oz chocolate chips
    • 1 cup chopped nuts (optional)
    Directions:
    Preheat oven to 375 degrees.

    In one bowl, combine flours, flax seeds, baking soda, and salt. Set aside.

    Cream butter with sugars. Mix in vanilla. Incorporate eggs, one at a time.

    Incorporate the dry mixture into the creamed mixture. Stir in chocolate chips and nuts (if using).

    Drop by spoonful onto ungreased cookie sheets. Bake until golden brown. (My oven is weird. It bakes some things fast and others slowly. It takes my oven about 14 minutes. I would start checking though between 9 to 11 minutes.)

    Notes: Instead of using 1 cup of nuts, you could make this recipe your own by adding some of the following:
    • Raisins
    • Dried cranberries
    • Dried snipped cherries
    • Shredded coconut
    • Pumpkin seeds
    • Or maybe just a mix of several goodies

    Barley-Mushroom Soup with Caramelized Onions

    I love soup -- especially when the weather is cold. Give me a steaming bowl of soup and a piece of crusty bread. That's all I need to make me feel warm and full and happy. Since Spring has been such an enormous tease this year, I've had a couple extra frosty nights to enjoy my favorite soups.

    Last week, I made a terrific (if I do say so) pot of soup. My recipe is a modified version of a recipe from Vegetarian Cooking for Everyone by Deborah Madison. This is because I had some rag-tag ends in the fridge that I wanted to use up.

    This soup uses barley, which makes it very hearty and satisfying. I also used cremini mushrooms (i.e., baby bellas). You could use something else, but I'd suggest something with a strong earthy flavor.

    This recipe calls for caramelized onions, which takes quite a while. I suppose the soup would still be good even if you didn't, but the flavor is so much sweeter and richer if you do.

    Finally, this recipe calls for some grated pecorino. I had pecorino on hand, but if you don't, I think parmesan or manchego might work. I think you'd want to look for a hard, salty cheese.

    Make it Vegan: You could leave the cheese out, and then your soup would be vegan. I tried this for myself, and it was still really, really good.

    Cheers!

    Barley-Mushroom Soup with Caramelized Onions

    Ingredients:
    1/4 cup olive oil (approx)
    3 onions, diced (small)
    2 tsp dried rosemary
    1 cup pearl barley, rinsed and drained
    3/4 - 1 cup diced tomatoes (I used canned)
    8 - 10 oz chopped cremini mushrooms
    2-3 stalks of celery, diced
    2 carrots, peeled and diced
    2 Qts vegetable stock
    Salt and pepper to taste
    Grated pecorino (optional)

    Directions
    Heat the oil in a soup pot. Add the onions. Cover and cook over low heat about 40-50 minutes. Raise the heat to medium. Remove cover and cook until onions are caramelized -- about 10 minutes. You'll want to stir frequently so they don't burn.

    When the onions are done, add the rosemary, barley, and vegetables. Stir it up. Add the stock and bring it to a boil. Partially cover the pot. Lower the heat and simmer until the barley and vegetables are tender. About 25 minutes.

    Season the soup with salt and pepper to taste. (However, if you are going to use cheese, remember that the cheese will add some saltiness, too, so you might want to undersalt a tad.) If desired, serve with grated cheese on top.
    Related Posts Plugin for WordPress, Blogger...