Wednesday, March 30, 2011

Part 2: Shredding/Grating Coconut

In Part 1, I wrote about selecting and opening coconuts. After the coconut is open though, how do you use it?

If you're interested in using fresh coconut, you need a way to grate it.

I love cooking with coconut. Fresh coconut, that is. IMHO, the dry, white, sugary shreds of sawdust sold in bags are not fit to bear the name of coconut. I've heard that they're the pulp that's left over after the oil and moisture have been extracted for coconut milk. I can believe that because they don't even compare to the fresh stuff.

Bench-type grater
$16.50 from GroceryThai.com

In the past, I'd use a table knife to extract thin slices (about 1/2" wide) at a time. (Note: Please, don't use a sharp knife. I did that once, and the knife slipped, giving me a 1 1/2 - 2" long gash in my palm) Then I'd put all my slices in my Vitamix blender and pulse it to "grate" them. However, I'd always long for a tool like the one I'd seen used on Guam. 

It was basically a bench or a long board with a serrated metal disk at one end. A person would put a bowl or plate on the ground under the disk. Then, they would sit on the bench/board and grate the coconut on the disk. The grated meat would fall to the plate. I've seen people grate whole coconuts efficiently in a matter of a few minutes.

I began hunting for coconut graters/shredders. I saw some pretty cool gadgets online, but in the end I decided to go back to basics and ordered three simple tools from a site called GroceryThai.com.

Exhibit A
Exhibit A:  This item has blades on both ends. One is for making fine gratings. The other is for wider shreds. It was only $4.50, which probably accounts for the very flimsy construction of this tool. Even the color used to dye the tool was coming off on my hand.

As for performance, it took some real pressure and wrist strength to get it to work. However, I couldn't help feeling that any significant amount of pressure would break the tool. Since I didn't want to injure myself, I gave up almost immediately.

Exhibit B
Exhibit B: This grater was $4.99. Although it was only 49 cents more, there was a noticeable improvement in construction. For starters, the blade felt like it wasn't going to fly off and hit me in the eye.

The round, serrated blade that you see worked well. However, it required considerable wrist strength, and I had to keep stopping in order to rest.

Although you can't see it in this photo, there is a scraping tool for wider shreds on the other side of the blade. I found that tool useless. I couldn't get enough purchase on the meat to make any shreds.

Overall, I would not recommend this tool. It hurt my wrist. Also, I have big hands, so I kept worrying that I would skin my knuckles on the scraper.

Exhibit C
Exhibit C: This item was listed as a tabletop grater for $11.50. I debated between getting this item or the bench you see pictured at the top of this screen. The difference in cost was minimal, but ultimately, I decided a potentially lethal piece of furniture around small children was not altogether prudent. Also, with limited storage space, this one could hang on the wall.

It's a very sturdy tool, but I'm not sure how it could be used on the tabletop. Maybe you could clamp it. Otherwise, I'd be afraid of the wood slipping.

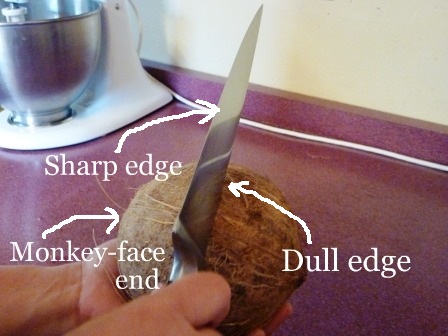
I ended up putting it on a small child-sized chair and sitting on it, just like I remember from my days on Guam. It worked beautifully! I grated half a coconut in under 2 minutes -- sure beats all the work of removing the coconut from the shell with a knife. (Note: There is a special tool available for removing all of the coconut meat in one piece. But if I'm going to grate it anyway, I think this is just as fast as removing, cutting, and then grating in a blender.)

I only wish I had read the description better, because I was expecting a bigger board like the ones from my childhood. This was small -- about 12"L x 3"W. However, the essential part of this tool -- the scraper -- is attached by three screws, which I think I can remove and attach to a bigger (and prettier) board. In the meantime, I'm going to drill some holes in this one so that I can put it away.

Now there are other types of graters. Lots of types. If you have a local Indian or Southeast Asian grocer near you, you might want to check in and see what they have. However, as a caution, I would be leery of any that use suction to attach to a countertop. I have some tools like that, and I always end up clamping them down. The last thing you want is some whirling scraping blade flying off the counter.

Part 1: Selecting and Opening Coconuts

When I was in fifth grade, we moved from the frozen North to a tropical island. I remember going late at night from the airport to the hotel, counting coconut palms the whole way.

Thanks to a diversion to the Philippines because of a tropical storm, we'd been traveling for at least a day and didn't arrive at our destination until quite late. Still, after checking into our room, the first thing I did was run out to the hotel parking lot and grab as many coconuts as I could carry. I've been koo-koo for coconuts ever since.

Nowadays, when I'm picking coconuts at the store (not the young green ones, but the brown kind that look like a monkey head), I get a lot of questions about what to look for. I'd love for every one to share my joy, so I'm sharing a few tips.

I think it looks like a capuchin monkey --
or maybe a lemur, at any rate
Selecting a Coconut
  1. Make sure there are no cracks, holes, or breaks.
  2. Look for any signs of mold or mildew. I think it should go without saying, but you don't want that.
  3. Especially check around the "monkey face." Make sure that the "monkey face eyes" are not soft or moldy or spotty. I've noticed that this is where the coconut palm roots first appear. Often, I've found soft spots indicate that the roots have started forming.
  4. Shake the coconut. You want to hear lots of water inside. More fluid means a younger, softer, moister coconut.
Note: This doesn't mean that you're guaranteed a great coconut, but hopefully it will be a good one. I also recommend getting a couple because you can never be completely sure until you open them.


Opening a Coconut

This is how my Chamorro teacher taught us to open coconuts.
  1.  Hold the coconut in one hand. 
  2. With the other hand, use a heavy knife or cleaver to strike the coconut along its middle. I like to use the heaviest part of the knife, near the handle.

    Safety Tip: Hit with the dull side of the blade. Do not use the sharp side of the blade or you'll wreck your knife and do yourself an injury.

    Note: This is not the time to be shy. Polite tapping and knocking aren't going to work. Be decisive and firm in striking your blows.

    Note: Instead of a knife, you could use the nail remover on a hammer, striking so that the prongs land in a line along the coconut's equator just the way a knife would. If you use the "hammering" end, you can bash the coconut into tiny bits where you strike it.
  3. After striking, turn the coconut slightly in your hand and whack it again. 
  4. Continue in this fashion, striking a blow at the coconut's equator and then turning. Do this until you see a crack. 
  5. Drain the coconut water through the crack into a container. You can drink this if you want.
  6. Continue striking/turning to open the coconut completely.
Note: After you break your coconut open, taste a piece. It should taste fresh and sweet and coconutty. If it tastes moldy or rancid, chuck it.1 That's why we got two coconuts. :-)

If you want to learn how to grate coconut meat easily, check out Part 2: Shredding/Grating Coconut.


1When I get a bad coconut, I put it out for the birds and squirrels. They don't seem to mind.

Monday, March 28, 2011

Banana Smoothies

One for me, One to share
If I'm in a rush for breakfast or just craving something sweet, a banana smoothie usually hits the spot. Smooth, creamy, cold, and frothy -- it feels decadent, but it's not.

Now the instructional designer in me is cringing because I don't have a really precise recipe to give you. I tend to just dump stuff in the blender. However, smoothies are really hard to mess up, so I think if you try making this, you'll be OK.

Banana Smoothie

Ingredients:
  • 1 Banana (preferably one that is quite ripe or a little overripe)
  • Sweetener of your choice, to taste
  • A few drops of vanilla (maybe about 1/16 to 1/8 of a tsp)
  • A few ice cubes
  • Non-dairy milk of your choice, enough to reach a consistency that you like (For me, it's approx. 3/4 - 1 cup)
Directions:
Put everything in a blender and blend until smooth and frothy.

Notes:
I like agave nectar because it has a light flavor and a lower glycemic index than sugar, but you could use anything you like -- sugar, honey, maple syrup... I've even used palm sugar and date sugar -- I think they're especially good with the banana.

I have a Vitamix blender, which is like the granddaddy of all blenders. You could probably blend a wooden post in it. As a result, ice is not an issue. My old blender couldn't handle big ice cubes, though, so I'd have to crush the ice first.

Sometimes, I omit the vanilla and ice. Instead, I add frozen fruit to make it cold -- pineapple, mango, and strawberries are all great additions.

You can use any non-dairy milk you like. My favorites are Silk soymilk and Almond Breeze almond milk because they make it very creamy, more milkshake like. However, if I have some leftover coconut milk, I'll even toss that in -- especially with some frozen pineapple, I feel like I'm on a vacation in the tropics.

Sunday, March 27, 2011

Whole Wheat Chocolate Chip Cookies

My boys are picky eaters, but they love chocolate chip cookies. They'll also eat things in chocolate chip cookies that they wouldn't normally touch, so I try to sneak in fiber, omega-fatty acids, and other healthful stuff.

Now I won't go so far as to say that my recipe is healthful. It's just less unhealthful than lots of other recipes.

A couple of notes on this recipe:
  • I like to use white whole wheat flour when I bake. Not whole wheat flour made from red wheat.
  • Below, I just listed 2 cups of flour. You could use 2 cups of all-purpose (though they wouldn't be whole wheat cookies then) or 2 cups whole wheat or any mix of all-purpose and whole wheat that will give you two cups. I usually do a 50/50 mix.
  • If you don't have almond meal, no big. Just add another 1/4 cup flour.
  • Make it Vegan: 1) Replace the butter with a non-hydrogenated spread like Earth Balance or Smart Balance. One day I'd like to try replacing the butter with coconut oil. When I do, I'll let you know how it works. 2) In the past, I've had good results replacing eggs with a substitute called Ener-G. 3) Use vegan chocolate chips.

Whole Wheat Chocolate Chip Cookies

Ingredients:
  • 2 cups flour
  • 1/2 cup almond flour (sometimes called almond meal)
  • 1-2 Tbsp ground flax seeds (optional)
  • 1 tsp baking soda
  • 1/2 tsp salt
  • 1 cup butter, softened
  • 3/4 cup sugar
  • 3/4 cup brown sugar, packed
  • 2 tsp vanilla
  • 2 eggs
  • 12 oz chocolate chips
  • 1 cup chopped nuts (optional)
Directions:
Preheat oven to 375 degrees.

In one bowl, combine flours, flax seeds, baking soda, and salt. Set aside.

Cream butter with sugars. Mix in vanilla. Incorporate eggs, one at a time.

Incorporate the dry mixture into the creamed mixture. Stir in chocolate chips and nuts (if using).

Drop by spoonful onto ungreased cookie sheets. Bake until golden brown. (My oven is weird. It bakes some things fast and others slowly. It takes my oven about 14 minutes. I would start checking though between 9 to 11 minutes.)

Notes: Instead of using 1 cup of nuts, you could make this recipe your own by adding some of the following:
  • Raisins
  • Dried cranberries
  • Dried snipped cherries
  • Shredded coconut
  • Pumpkin seeds
  • Or maybe just a mix of several goodies

Barley-Mushroom Soup with Caramelized Onions

I love soup -- especially when the weather is cold. Give me a steaming bowl of soup and a piece of crusty bread. That's all I need to make me feel warm and full and happy. Since Spring has been such an enormous tease this year, I've had a couple extra frosty nights to enjoy my favorite soups.

Last week, I made a terrific (if I do say so) pot of soup. My recipe is a modified version of a recipe from Vegetarian Cooking for Everyone by Deborah Madison. This is because I had some rag-tag ends in the fridge that I wanted to use up.

This soup uses barley, which makes it very hearty and satisfying. I also used cremini mushrooms (i.e., baby bellas). You could use something else, but I'd suggest something with a strong earthy flavor.

This recipe calls for caramelized onions, which takes quite a while. I suppose the soup would still be good even if you didn't, but the flavor is so much sweeter and richer if you do.

Finally, this recipe calls for some grated pecorino. I had pecorino on hand, but if you don't, I think parmesan or manchego might work. I think you'd want to look for a hard, salty cheese.

Make it Vegan: You could leave the cheese out, and then your soup would be vegan. I tried this for myself, and it was still really, really good.

Cheers!

Barley-Mushroom Soup with Caramelized Onions

Ingredients:
1/4 cup olive oil (approx)
3 onions, diced (small)
2 tsp dried rosemary
1 cup pearl barley, rinsed and drained
3/4 - 1 cup diced tomatoes (I used canned)
8 - 10 oz chopped cremini mushrooms
2-3 stalks of celery, diced
2 carrots, peeled and diced
2 Qts vegetable stock
Salt and pepper to taste
Grated pecorino (optional)

Directions
Heat the oil in a soup pot. Add the onions. Cover and cook over low heat about 40-50 minutes. Raise the heat to medium. Remove cover and cook until onions are caramelized -- about 10 minutes. You'll want to stir frequently so they don't burn.

When the onions are done, add the rosemary, barley, and vegetables. Stir it up. Add the stock and bring it to a boil. Partially cover the pot. Lower the heat and simmer until the barley and vegetables are tender. About 25 minutes.

Season the soup with salt and pepper to taste. (However, if you are going to use cheese, remember that the cheese will add some saltiness, too, so you might want to undersalt a tad.) If desired, serve with grated cheese on top.
Related Posts Plugin for WordPress, Blogger...